
Azure Co-Sell Setup
Connect Automatum to Microsoft Partner Center referrals. This is the Integrations → Microsoft connection (Part 2 of 2). You need it to send and receive co-sell opportunities with Microsoft field sellers.
Part 2 of 2
Set up the Cloud Account (transact) app first. See Azure Integration (Start Here) for the full picture.
Co-sell uses its own app registration
Automatum uses two Azure AD apps. The Cloud Account app transacts and syncs offers (Azure Marketplace Setup). The Co-Sell app on this page is a second, dedicated app for Microsoft referrals. Register a separate app for co-sell — it needs extra API permissions and a redirect URI that the transact app does not. Set up the Cloud Account first.
Passwordless connection
Co-sell also uses Workload Identity Federation. You do not create or store a client secret.
Prerequisites
Before you connect co-sell, make sure you have:
- A connected Azure Cloud Account in Automatum (Azure Marketplace Setup)
- Your Microsoft Partner Network (MPN) ID
- Referrals Admin access in Partner Center
- A co-sell-eligible solution configured in Partner Center
- Permission to register an Azure AD app
- A Global Administrator (or Privileged Role Administrator) to grant admin consent for the app
Co-sell eligibility
Your solution must reach co-sell-ready status in Partner Center before Microsoft shares referrals. See Microsoft: Configure co-sell.
Step 1: Register the Co-Sell Azure AD Application
Register a dedicated app for co-sell. Keep it separate from your Cloud Account (transact) app — the co-sell app needs the extra API permissions and redirect URI below.
- Sign in to the Azure Portal.
- Go to Microsoft Entra ID > App registrations.
- Click New registration and enter:
- Name:
<Your Company> Co-Sell App - Supported account types: Accounts in this organizational directory only (Single tenant)
- Redirect URI: platform Web, value
https://api.automatum.io/integration/azure-partner-center/callback
- Name:
- Copy the Application (client) ID and Directory (tenant) ID from the Overview page.
Use the Web platform for the redirect URI
Add the redirect URI under Authentication > Add a platform > Web. Do not use Single-page application — the authorize step then fails with "endpoint only accepts POST" (AADSTS900561).
Step 2: Add API Permissions and Grant Admin Consent
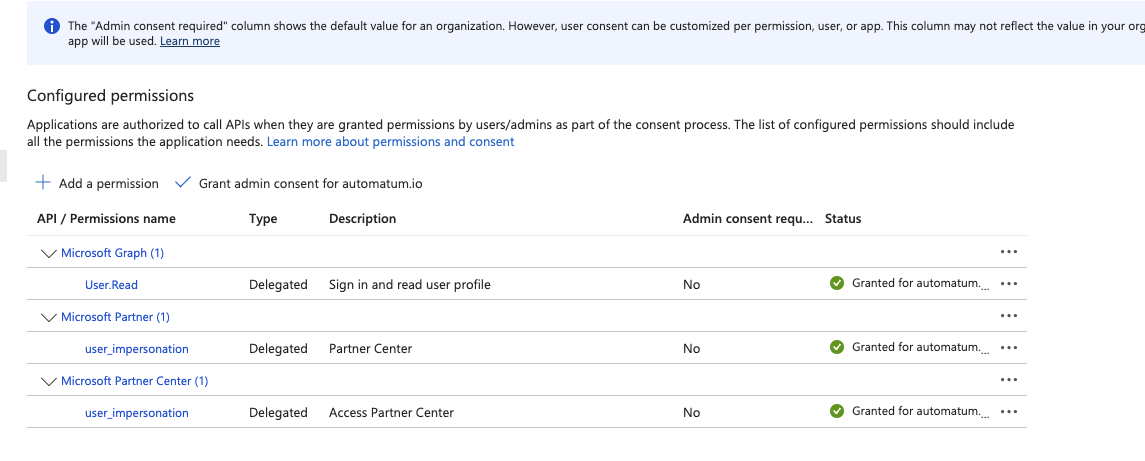
Co-sell uses delegated Partner Center permissions. Automatum calls the Partner Center Referrals API as the integration user you invite in Step 4.
- In your app registration, open API permissions.
- Click Add a permission > APIs my organization uses.
- Add each of these permissions:
| API | App (client) ID | Permission | Type |
|---|---|---|---|
| Microsoft Graph | — | User.Read | Delegated |
| Microsoft Partner | 4990cffe-04e8-4e8b-808a-1175604b879f | user_impersonation | Delegated |
| Microsoft Partner Center | fa3d9a0c-3fb0-42cc-9193-47c7ecd2edbd | user_impersonation | Delegated |
| Microsoft Partner Center (Legacy) | fabfbdc4-5751-471c-ac43-3826fa1afc31 | user_impersonation | Delegated |
Cannot find the API by name
Search by the application (client) ID shown in the table above. "Microsoft Partner" can also appear as "Microsoft Dev Center". The two Partner Center apps do not resolve to a friendly name — paste the ID.
- For each API, select Delegated permissions, check the permission (
user_impersonation, orUser.Readfor Microsoft Graph), then click Add permissions.
Now grant admin consent so users are never prompted:
- Back on the API permissions page, above the Configured permissions list, click Grant admin consent for [your organization] (next to + Add a permission).
- In the confirmation dialog, click Yes.
- Confirm the Status column shows a green check Granted for [your organization] for every permission.
Admin consent is required
Only a Global Administrator or Privileged Role Administrator can grant admin consent. Without it, the connection fails with an insufficient-privileges or consent error.
Step 3: Add a Federated Credential
- In the app registration, open Certificates & secrets.
- Select the Federated credentials tab.
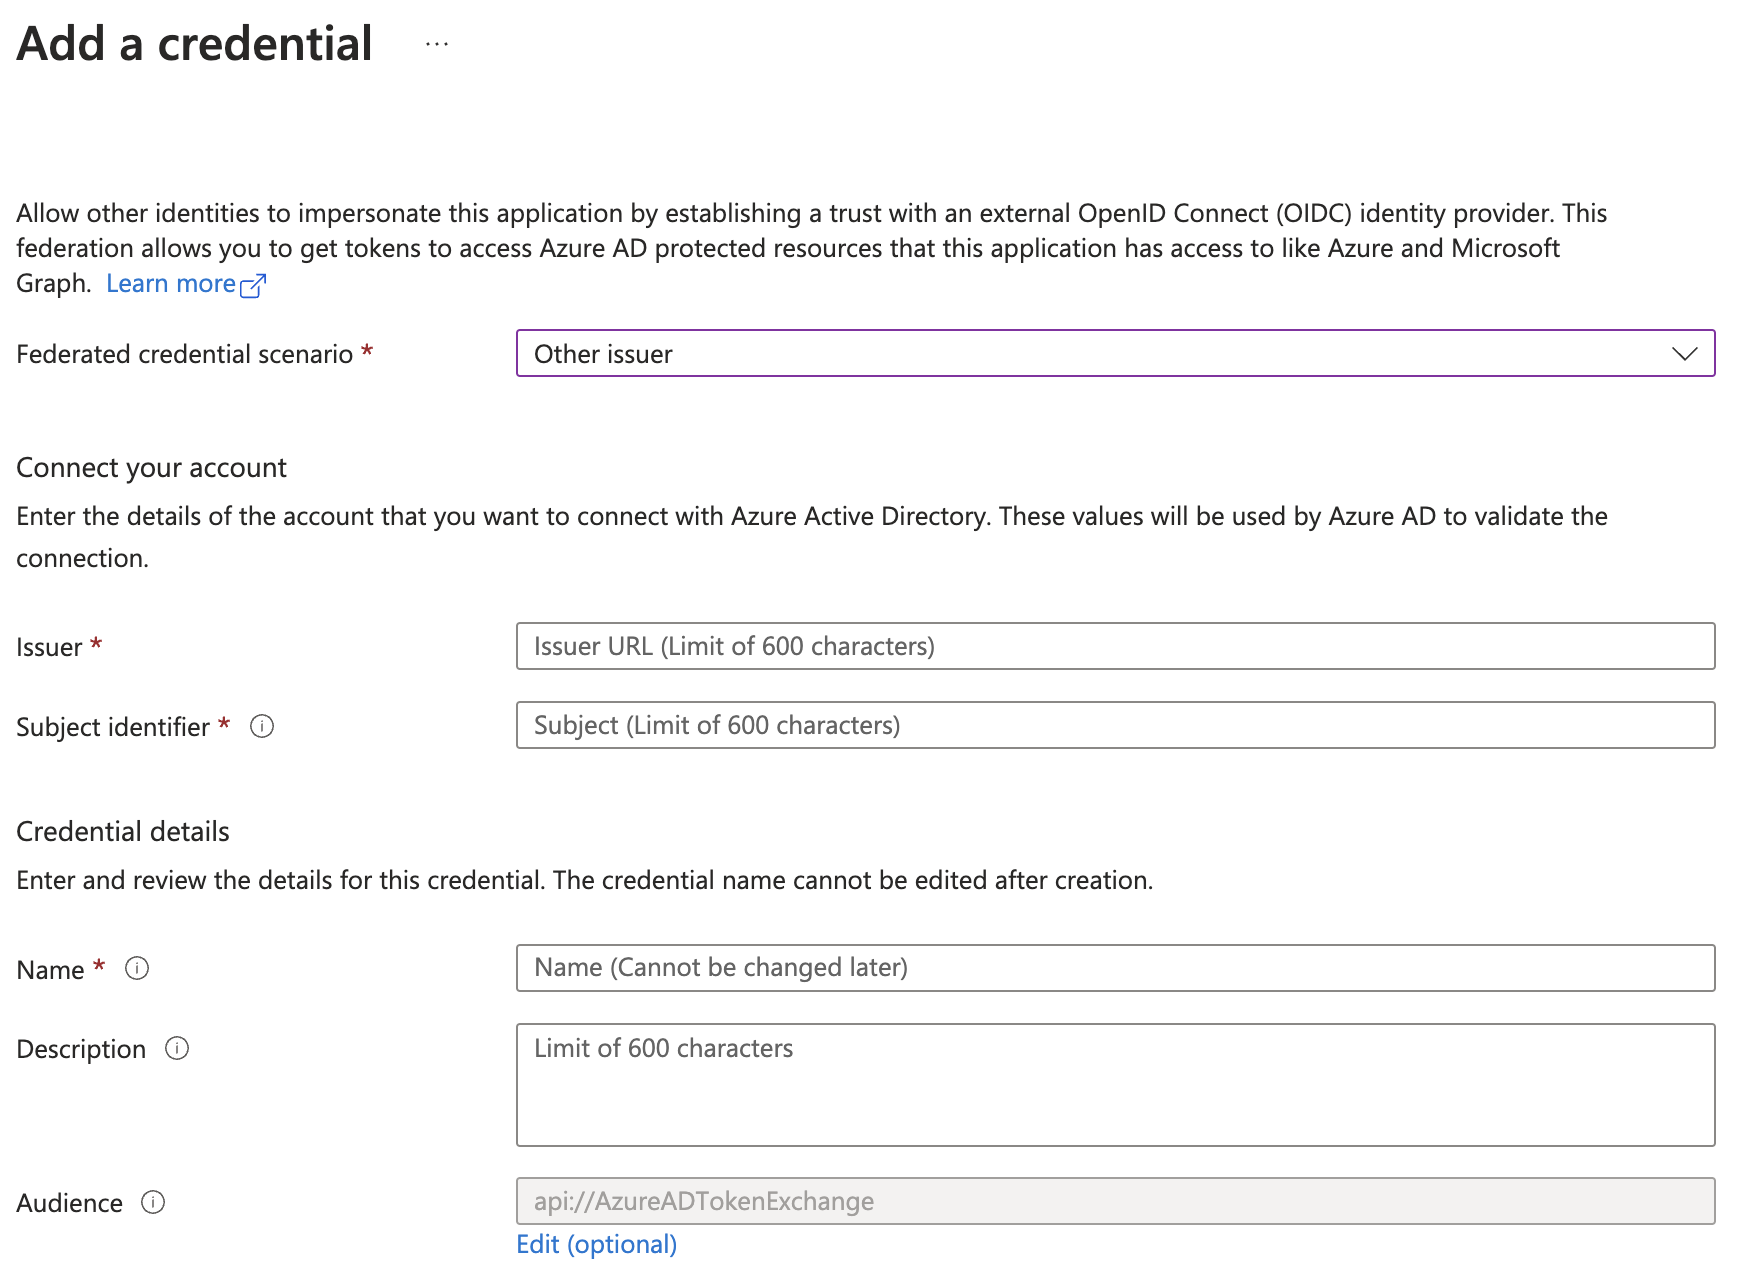
- Click Add credential and set the scenario to Other issuer.
- Enter the Issuer, Subject identifier, Name, and Audience that Automatum shows on the Integrations → Microsoft card, then click Add.
Production reference values
On the production platform (app.automatum.io) the federated credential uses these values. The Integrations → Microsoft card always shows the exact values to copy, but you can confirm them here:
| Field | Value |
|---|---|
| Issuer | https://api.automatum.io |
| Subject identifier | automatum |
| Audience | api://AzureADTokenExchange |
| Name | automatum |
Copy the values exactly
Azure matches the incoming token on Issuer, Subject, and Audience. A single extra space breaks the connection. Use the copy button in Automatum for each field.
Step 4: Invite the Automatum Integration User
Automatum uses a dedicated integration user to read and write referrals.
- Sign in to Partner Center.
- Go to Settings > User management.
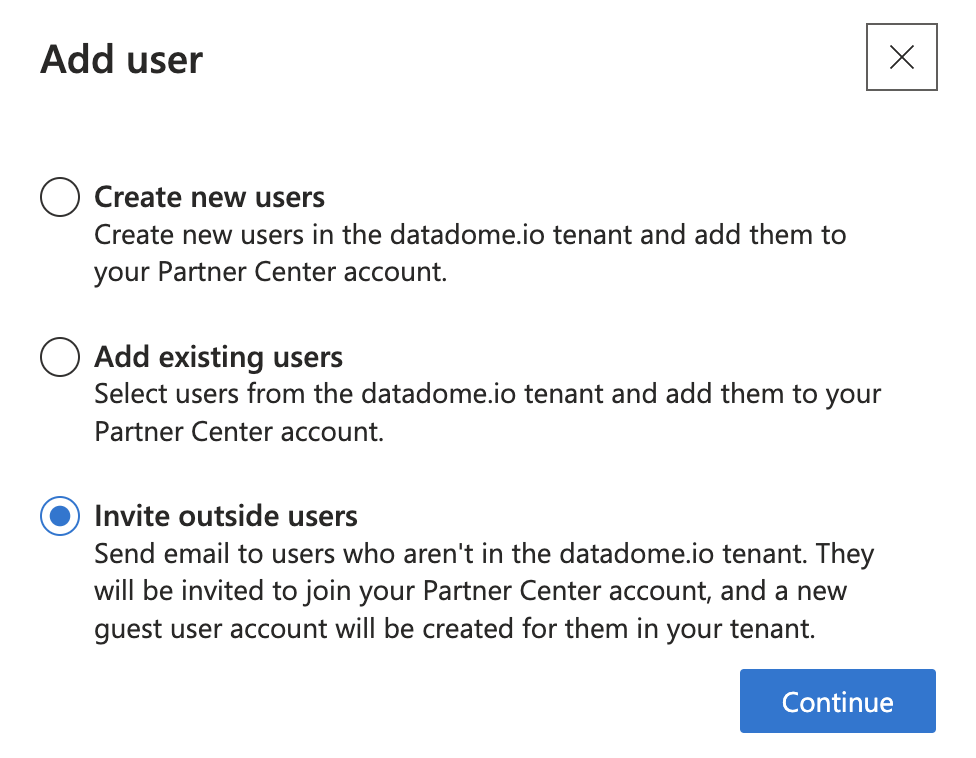
- Click Add user > Invite outside users.
- Enter the email address that Automatum shows on the co-sell card.
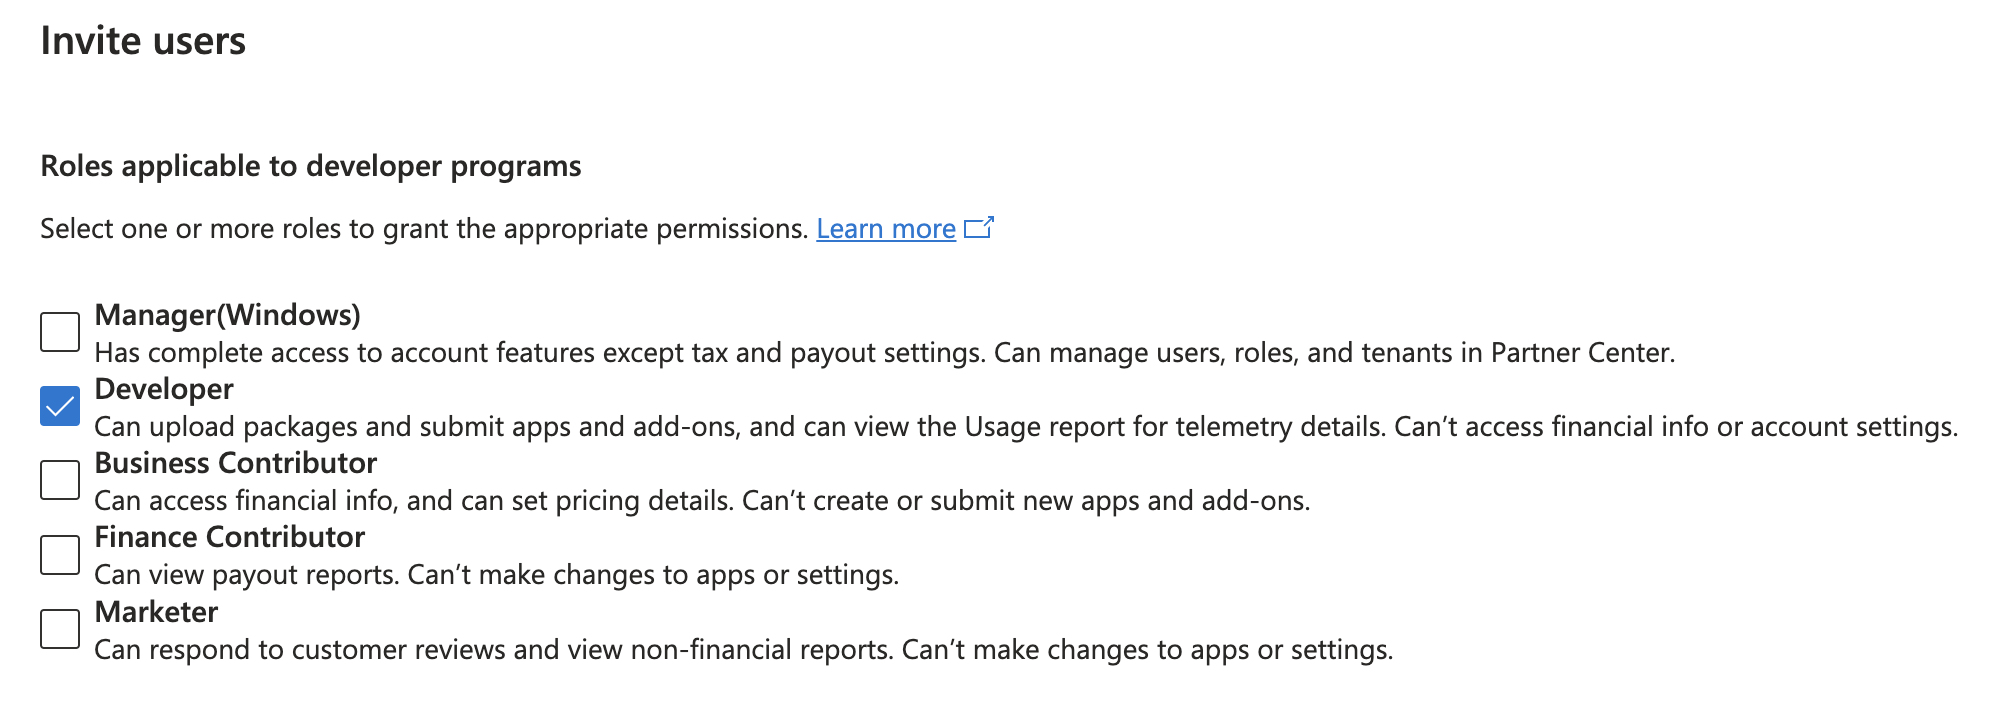
- Assign the Referrals Admin role (scoped to your entire organization).
- Click Invite (or Save).
Step 5: Add the Azure AD Application in Partner Center
- In User management, open the Azure AD applications tab.
- Click Add Azure AD Application and select your app from Step 1.
- Assign the Referrals Admin role.
- Click Add, then confirm the app appears in the list.
Step 6: Authorize and Connect in Automatum
- In Automatum, go to Settings > Integrations > Microsoft.
- Enter the Application (Client) ID and Directory (Tenant) ID.
- Click Authorize. Sign in with the integration user you invited in Step 4.
- Review the requested permissions, then click Accept.
- Return to Automatum and click Test Configuration.
Permissions can take time
Partner Center permission changes can take up to 24 hours to apply. If the test fails right after setup, wait and try again.
Step 7: Add Co-Sell Solutions
- In Partner Center, open your co-sell-eligible solution.
- Copy the Solution Name and Solution ID.
- In Automatum, add the solution under Integrations → Microsoft.
What Automatum Syncs
- Referrals you send to Microsoft
- Referrals Microsoft shares with you
- Opportunity status updates
- Solution mapping for co-sell deals
See Co-Sell Overview for how to manage opportunities.
Troubleshooting
Authorize Fails
- Confirm you signed in with the invited integration user, not your own account.
- Confirm the user has the Referrals Admin role.
- Confirm you granted admin consent for the app permissions (Step 2).
No Matching Federated Identity (AADSTS70021)
- Confirm the Issuer, Subject identifier, and Audience match Automatum exactly.
- Confirm the Audience is
api://AzureADTokenExchange.
Referrals Not Appearing
- Confirm your solution is co-sell-ready in Partner Center.
- Wait up to 24 hours for permissions to apply.
- Confirm the Solution ID in Automatum matches Partner Center.
Need Help?
Contact support@automatum.io or use the in-app chat for help with Azure co-sell.