
Azure Marketplace Setup
Connect your Azure Marketplace publisher account to Automatum. This is the Cloud Account connection (Part 1 of 2). You need it to onboard, sync offers, and transact.
Part 1 of 2 — start here
The full Azure integration has two parts. See Azure Integration (Start Here) for the overview, then set up co-sell after this page.
Passwordless connection
Automatum connects with Workload Identity Federation. You do not create or store a client secret. Azure trusts Automatum through a federated credential, so there is nothing to rotate and nothing that expires. This matches Microsoft's recommended practice for marketplace automation.
Co-sell uses a separate app
This page sets up the Cloud Account (transact) app. Microsoft co-sell referrals use a second, dedicated app with extra API permissions. Set that up after this page. See Azure Co-Sell Setup.
Prerequisites
Before you connect your Azure account, make sure you have:
- An active Microsoft Partner Center account
- Azure Marketplace publisher status (validated tax and payout profiles)
- Your Publisher ID
- Permission to register an app in Azure AD (Microsoft Entra ID)
- Partner Admin access in Partner Center (to add the app and assign a role)
- An Automatum organization
Not a seller yet?
Complete Partner Center enrollment first. See Become a Seller — Azure.
Integration Overview
Automatum uses the Microsoft Partner Center and Marketplace APIs to enable:
- Product listing synchronization
- Private offer creation and management
- Customer entitlement tracking
- Usage reporting for SaaS offers
Step 1: Register an Azure AD Application
- Sign in to the Azure Portal.
- Go to Microsoft Entra ID (Azure Active Directory) > App registrations.
- Click New registration.
- Enter these values:
- Name:
<Your Company> Marketplace App - Supported account types: Accounts in this organizational directory only (Single tenant)
- Redirect URI: leave blank
- Name:
- Click Register.
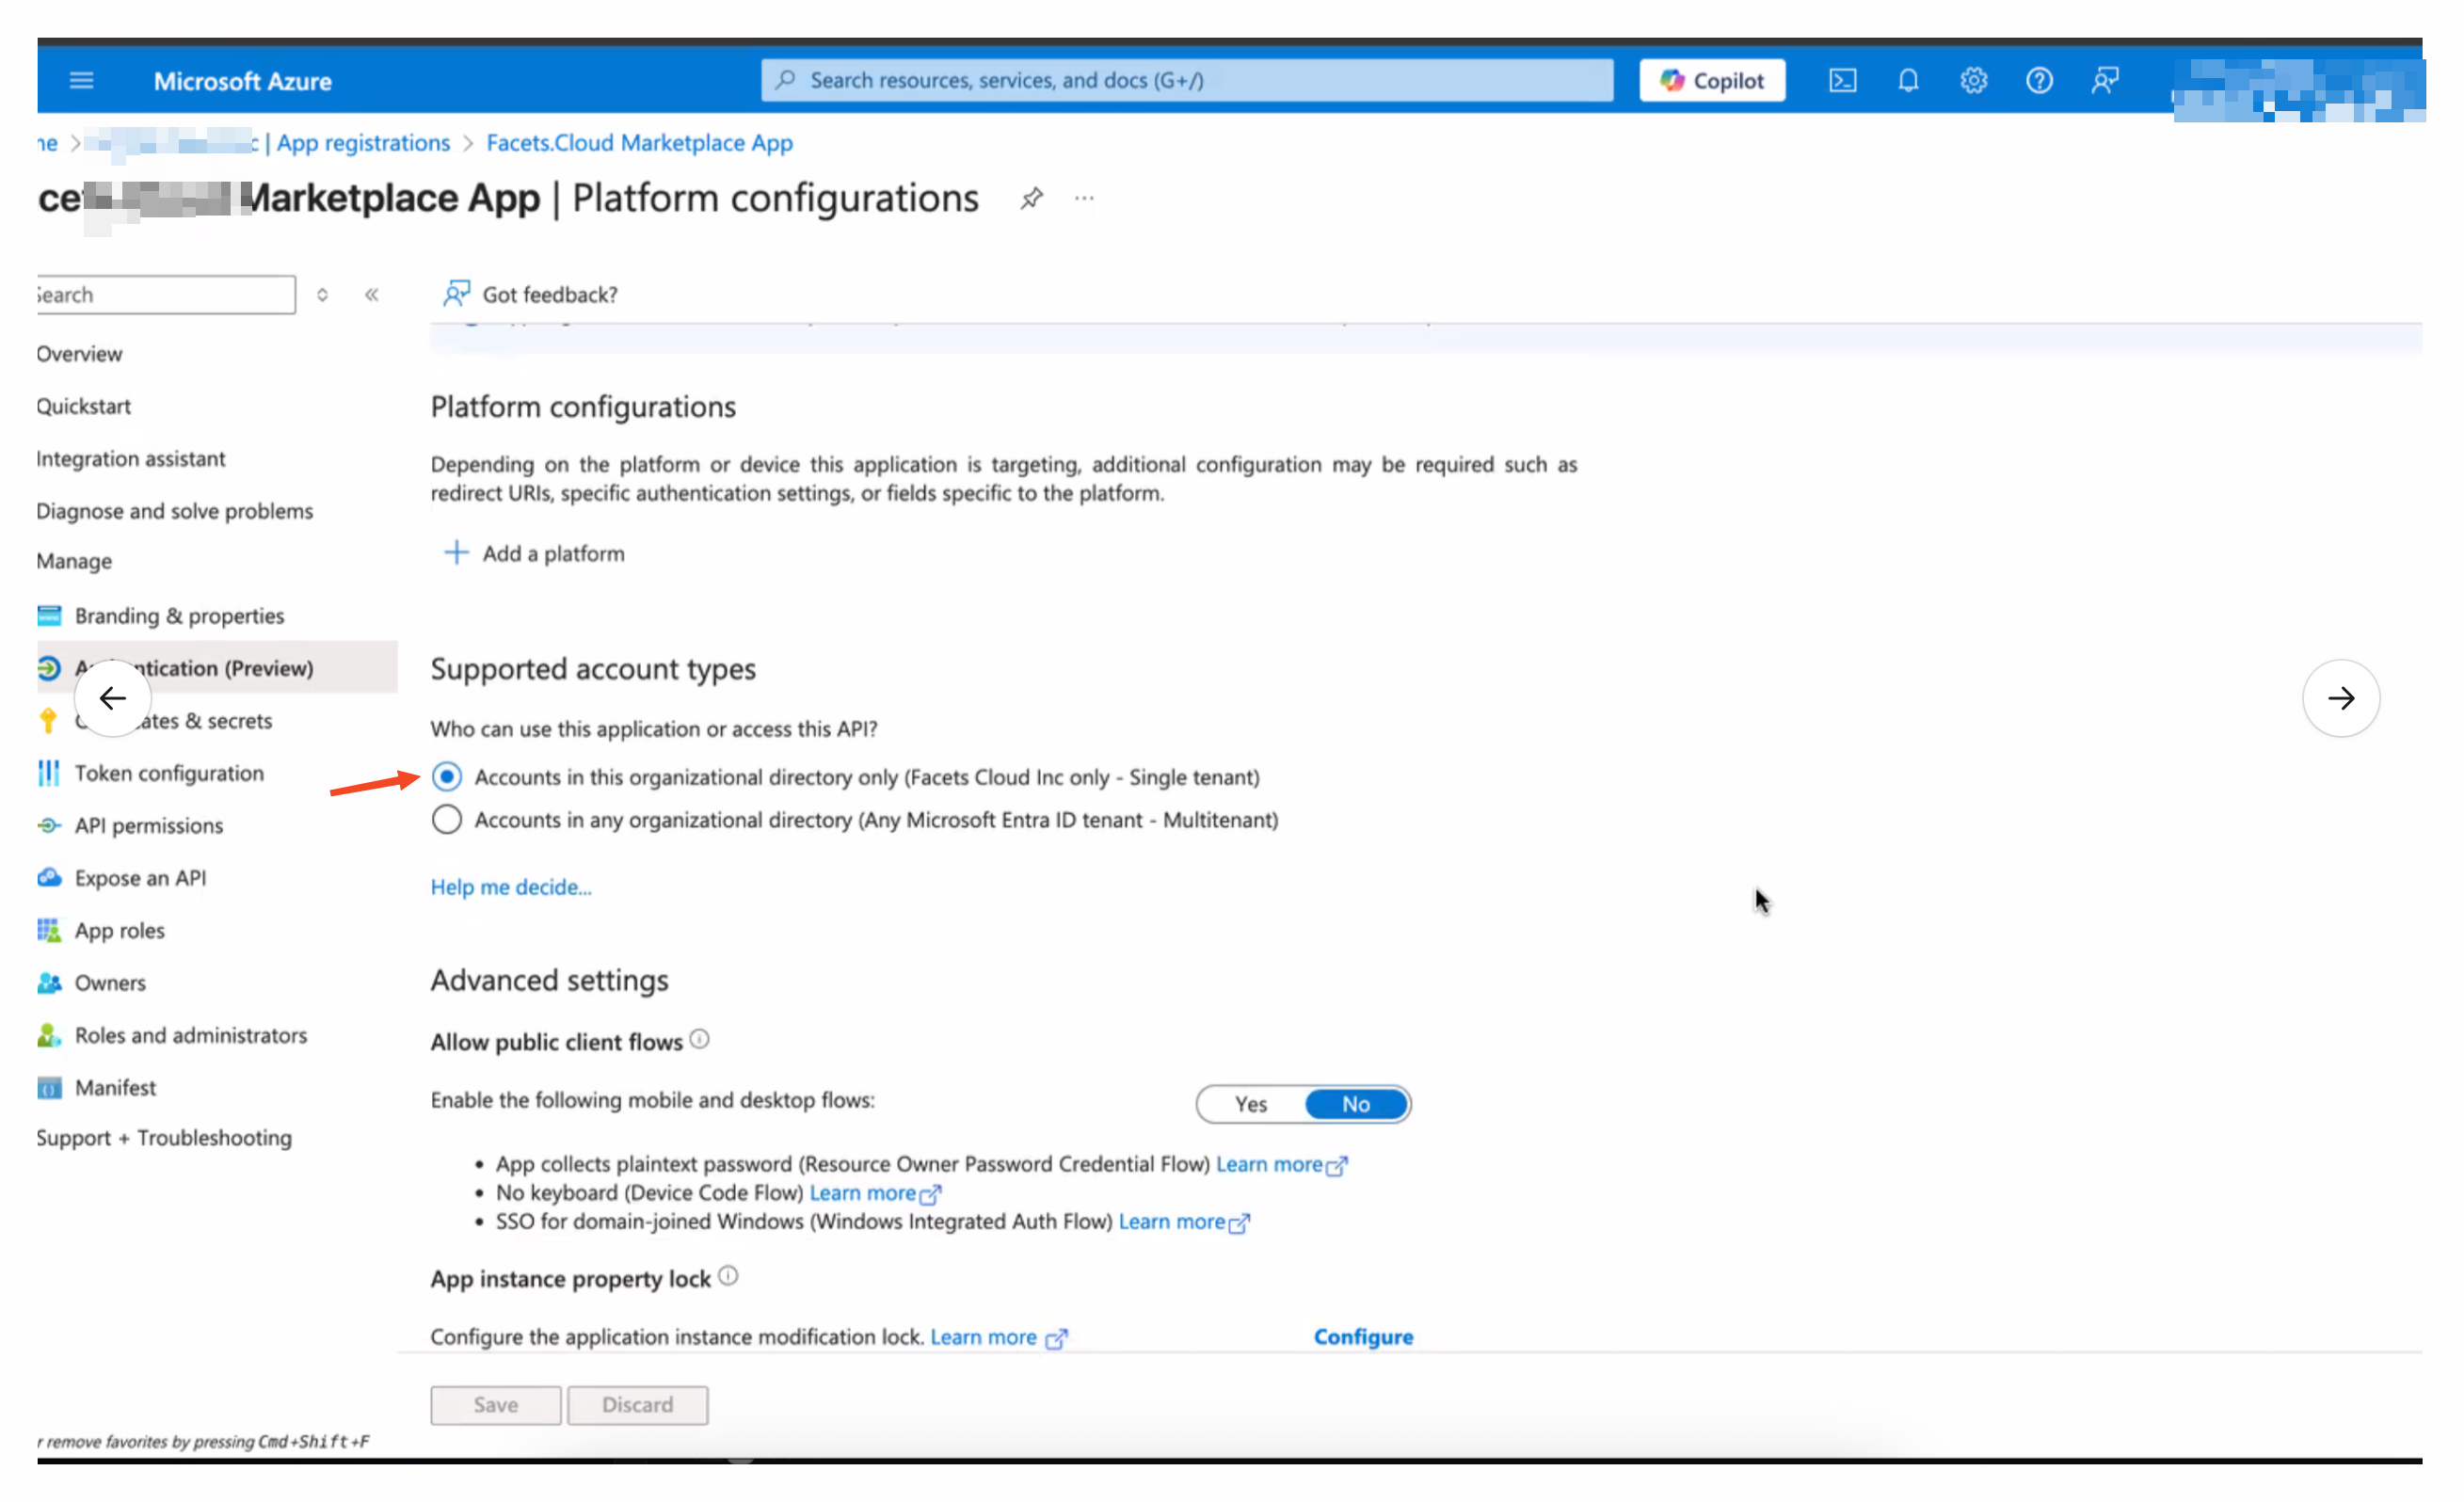
Step 2: Copy the Application and Tenant IDs
- Open your new app registration.
- On the Overview page, copy:
- Application (client) ID
- Directory (tenant) ID
- Keep both values. You paste them into Automatum in Step 5.
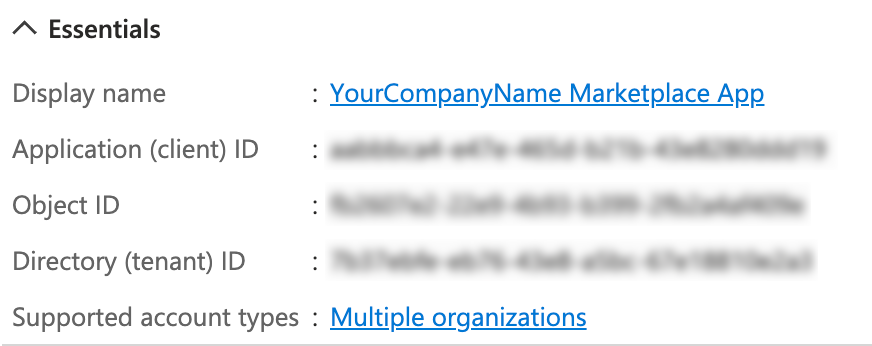
Step 3: Add a Federated Credential
This step establishes trust between your Azure app and Automatum. No secret is created.
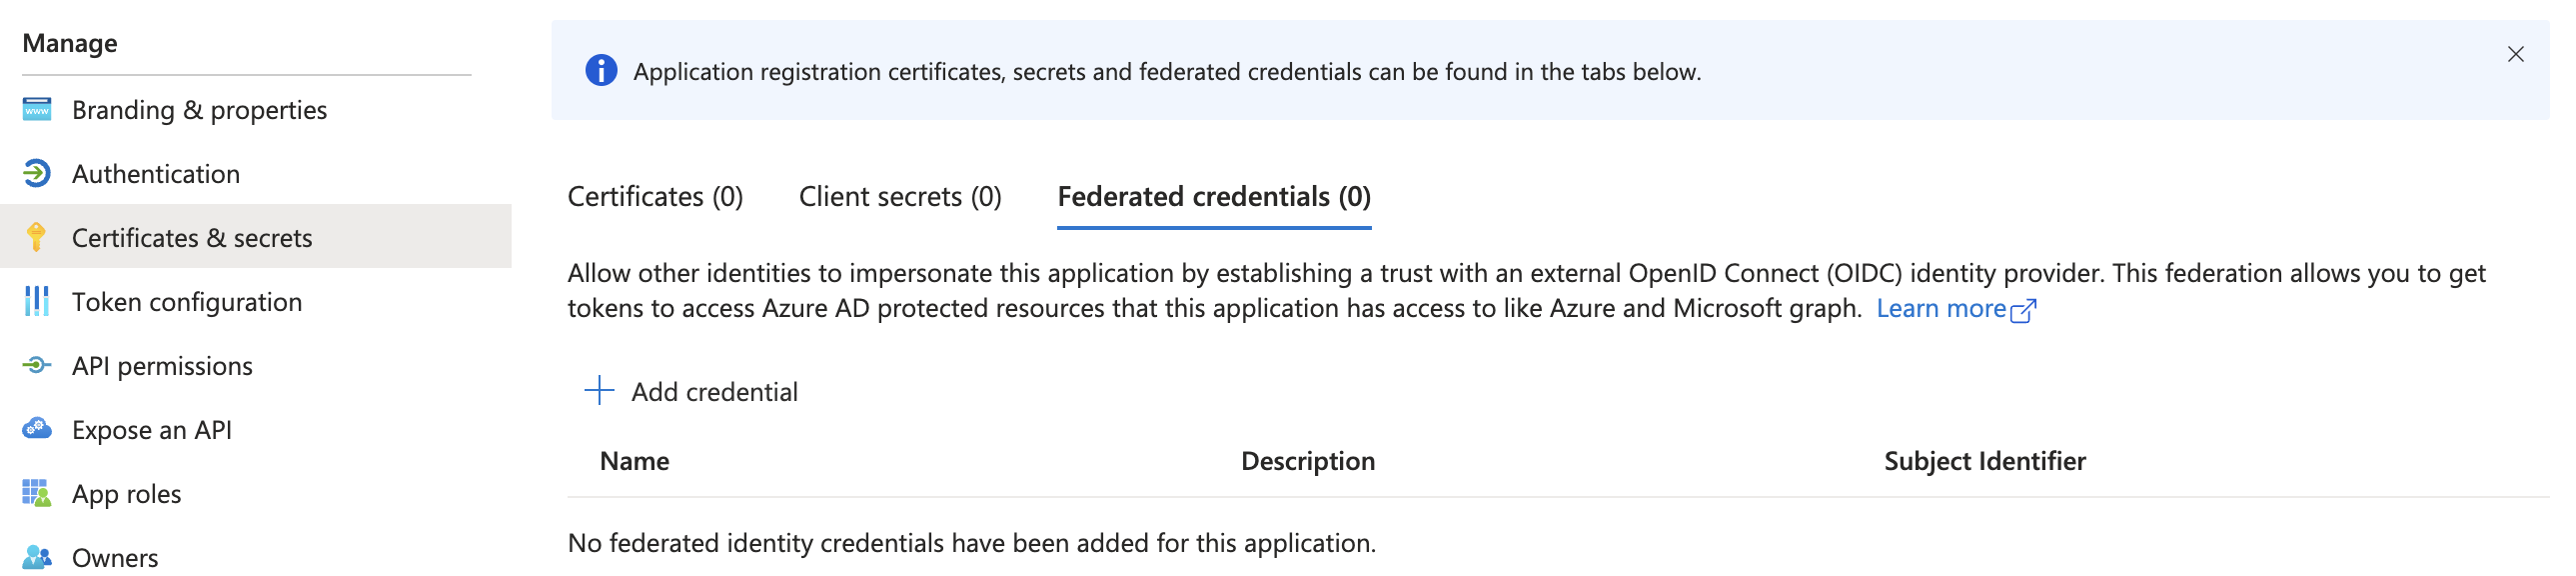
- In your app registration, open Certificates & secrets.
- Select the Federated credentials tab.
- Click Add credential.
- Set Federated credential scenario to Other issuer.
- Enter the values that Automatum shows on the Connect Azure Account screen:
| Field | Where to get it |
|---|---|
| Issuer | Copy from Automatum |
| Subject identifier | Copy from Automatum |
| Name | Copy from Automatum |
| Audience | api://AzureADTokenExchange (Automatum shows this) |
- Click Add.
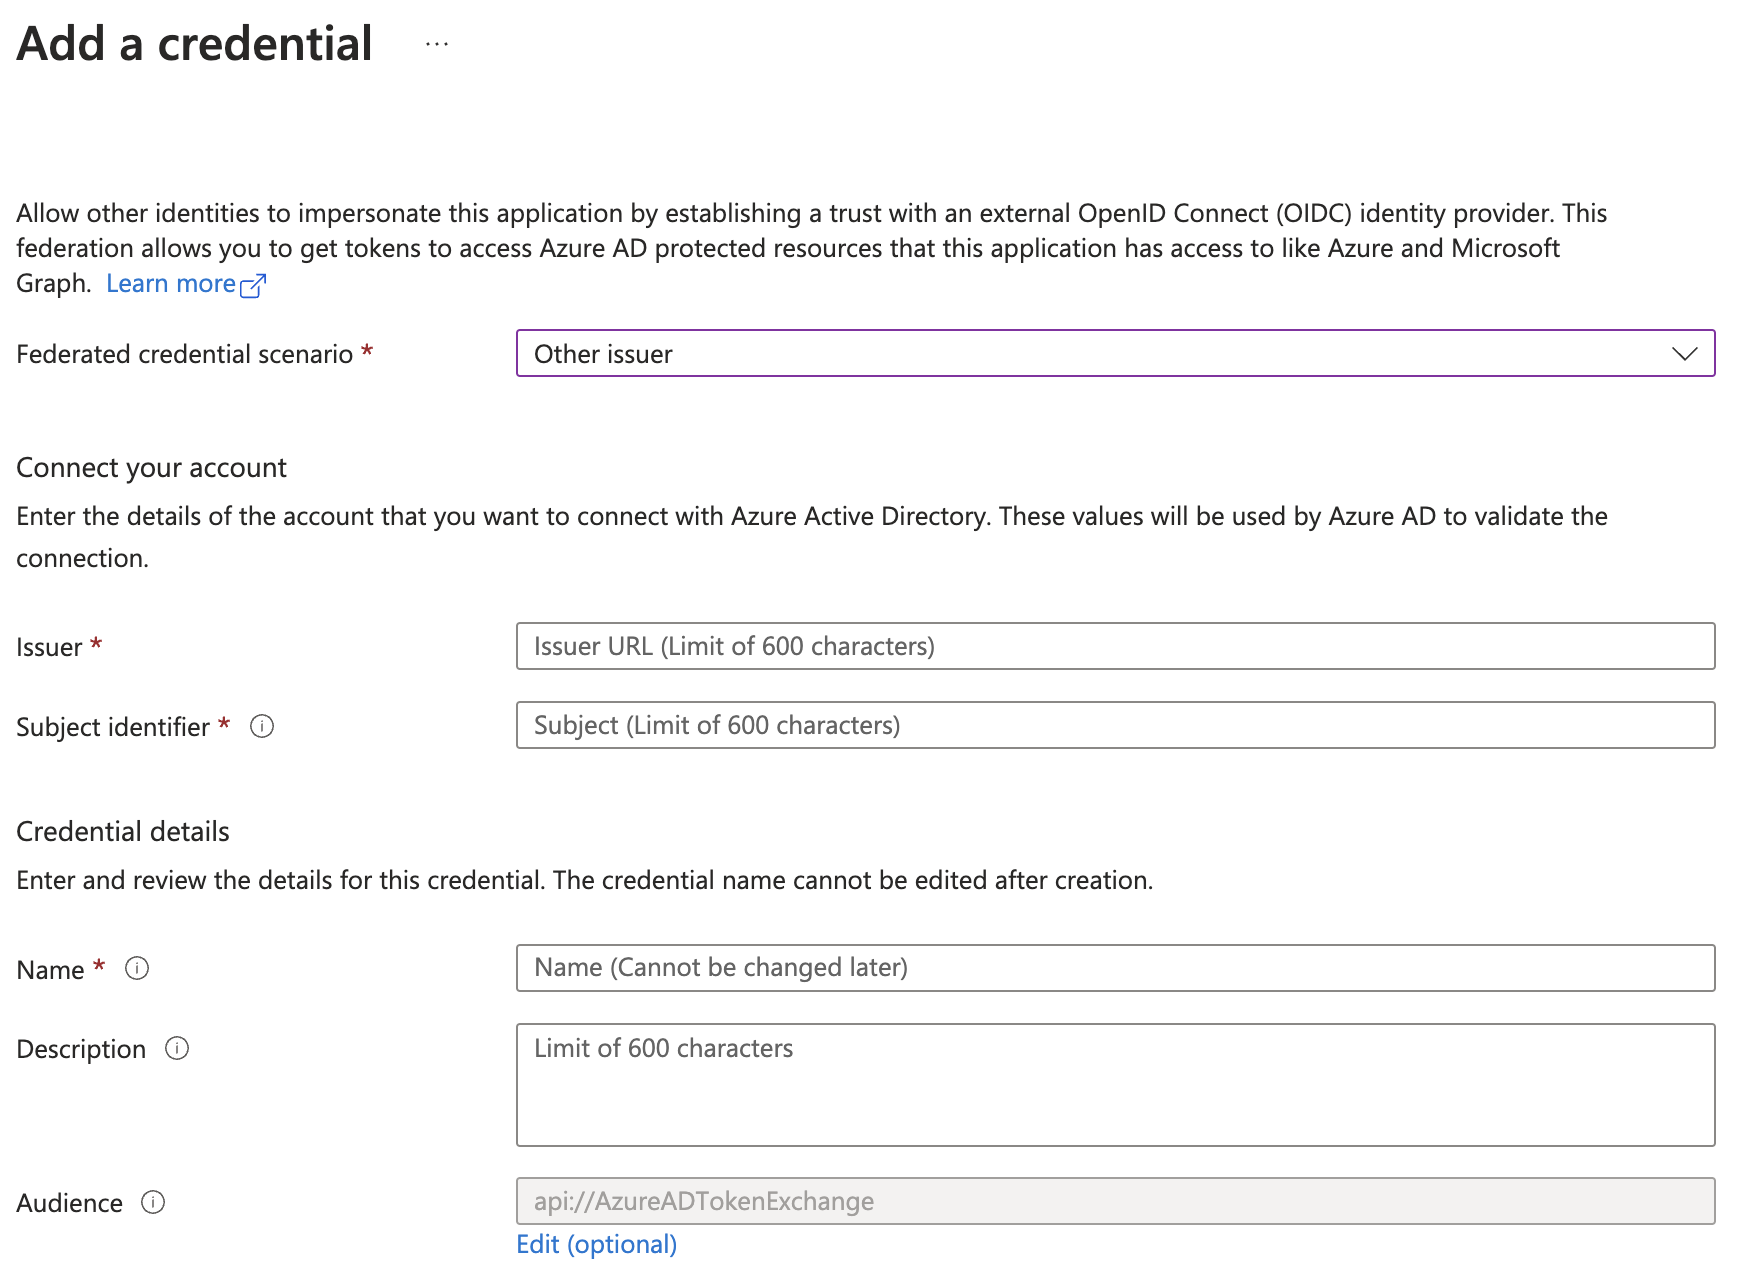
Copy the values exactly
Azure matches the incoming token on Issuer, Subject, and Audience. A single extra space breaks the connection. Use the copy button in Automatum for each field.
Production reference values
On the production platform (app.automatum.io) the federated credential uses these values. The Connect Azure Account screen always shows the exact values to copy, but you can confirm them here:
| Field | Value |
|---|---|
| Issuer | https://api.automatum.io |
| Subject identifier | automatum |
| Audience | api://AzureADTokenExchange |
| Name | automatum |
Using a client secret instead? Set the redirect URI too
Workload Identity Federation is the default and needs no secret. If your tenant cannot use federation, or for a first-time authorization, you can connect with a client secret instead:
- In Certificates & secrets, open the Client secrets tab.
- Click New client secret, set an expiry, then copy the Value.
- Go to Authentication > Add a platform > Web and add the redirect URI — a secret-based connection needs it. Copy the exact value Automatum shows on the Connect Azure Account screen. (You left this blank in Step 1 for federation.)
- Paste the secret into Automatum when it asks.
A client secret expires; you must rotate it before the expiry date. Federation does not expire, so prefer it. If you connect with a secret and later want to go passwordless, use Switch to federated in Automatum — it verifies a federated connection, then removes the stored secret.
Step 4: No Extra API Permissions Needed
The transact app is authorized by identity, not by API-permission scopes. You do not add anything under the app's API permissions blade, and you do not grant admin consent for it.
- Product ingestion and offer management — authorized by the app's Manager role in Partner Center (Step 5).
- SaaS fulfillment and metering — authorized by the app's Client ID on each offer's Technical configuration page in Partner Center.
Co-sell is different
The co-sell app does need delegated API permissions and admin consent. Keep co-sell on its own app. See Azure Co-Sell Setup.
Step 5: Grant the App Access in Partner Center
Automatum acts through your Azure AD app. Add the app in Partner Center and give it a role.
- Sign in to Partner Center.
- Go to Settings > Account settings > User management.
- Open the Azure AD applications tab.
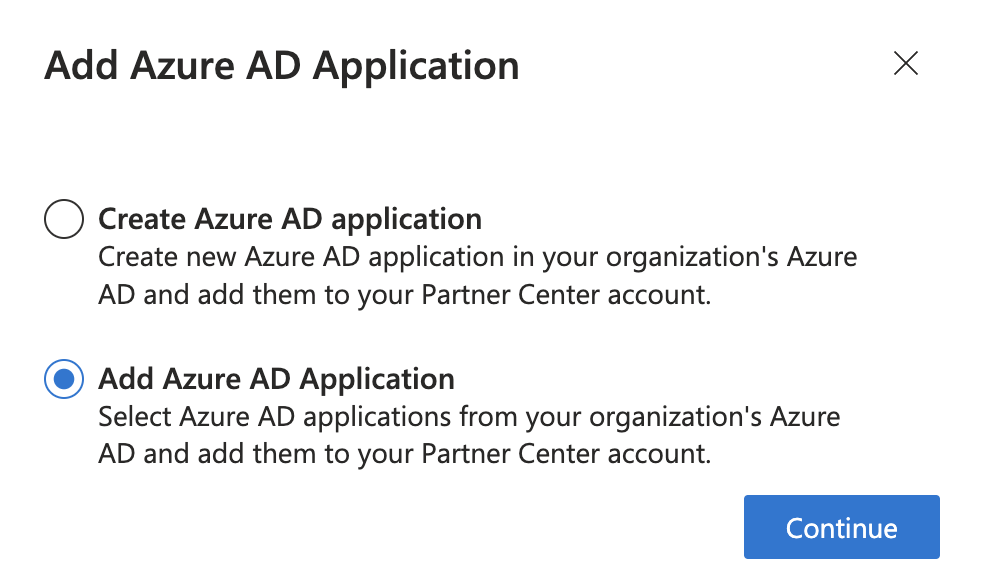
- Click Add Azure AD Application, then Add Azure AD Application.
- Select the app you created in Step 1.
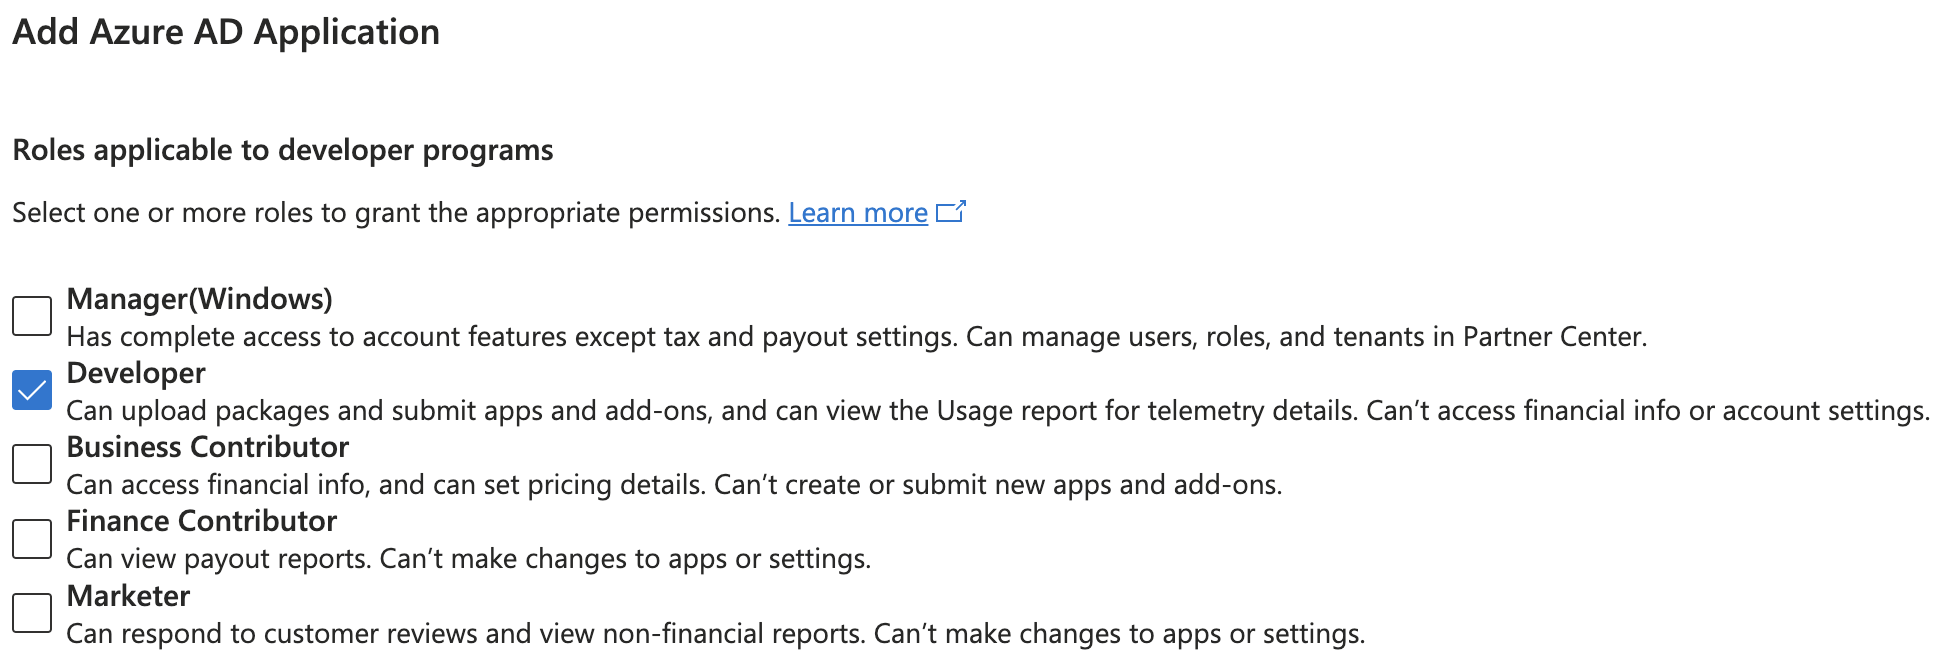
- Assign the Manager (Windows) role.
- Click Add, then confirm the app appears in the list.
Step 6: Configure in Automatum
- In Automatum, go to Settings > Cloud Accounts.
- Click Connect Azure Account.
- Enter these values:
- Tenant ID: your Directory (tenant) ID from Step 2
- Application (Client) ID: from Step 2
- Publisher ID: from Partner Center
- Copy the Issuer, Subject, Audience, and Name shown here into the federated credential in Step 3 if you have not done so.
- Click Test Connection.
- When the test passes, click Save.
Federation needs no secret
With a federated credential, Automatum does not ask for a client secret. The test connection succeeds with the IDs alone. If you chose the client-secret method in Step 3 instead, paste the secret here when Automatum asks.
Step 7: Sync Products
- Go to Listings.
- Click Sync from Azure.
- Select the offers you want to manage in Automatum.
- Click Import Selected.
Plan Selection
Azure Marketplace offers can have multiple plans. Automatum imports all plans associated with your offers.
Supported Offer Types
| Offer Type | Private Offers | Usage Tracking | Metering |
|---|---|---|---|
| SaaS | ✅ | ✅ | ✅ |
Troubleshooting
Connection Failed
Error: No matching federated identity record found (AADSTS70021 / AADSTS700213)
- Open Certificates & secrets > Federated credentials.
- Confirm the Issuer, Subject identifier, and Audience match Automatum exactly.
- Confirm the Audience is
api://AzureADTokenExchange.
Error: Application not found in directory (AADSTS700016)
- Confirm the Application (Client) ID and Tenant ID are correct.
- Confirm you registered the app in the same tenant you are connecting.
Error: Insufficient privileges
- Confirm the app has the Manager (Windows) role in Partner Center (Step 5).
- For SaaS fulfillment or metering, confirm the app's Client ID is set on the offer's Technical configuration page.
Products Not Syncing
No offers found
- Confirm you have published offers in Partner Center.
- Confirm the offers are in Live or Preview status.
- Confirm your Publisher ID is correct.
Partial sync
- Some offer types may not be fully supported yet.
- Check the sync log in Settings > Cloud Accounts > Azure > Sync History.
Private Offers Not Creating
Error: Plan not found
- Confirm the plan ID exists in your offer.
- Confirm the plan is active and published.
Error: Customer not eligible
- Confirm the customer Azure tenant ID is correct.
- Confirm the customer has the necessary permissions.
Azure-Specific Features
Plan Management
Azure offers can have multiple plans with different pricing.
Billing Terms
Supported billing terms for Azure private offers:
- Monthly
- Annual
- Multi-year (up to 3 years)
- Custom durations
Security Best Practices
- No secrets to manage — federation removes long-lived client secrets.
- Enable MFA on your Partner Center account.
- Review audit logs in Partner Center regularly.
- Limit API permissions to only what you need.
- Remove the app from Partner Center if you stop using Automatum.
Next Steps
Resources
Need Help?
Contact hello@automatum.io or use the in-app chat for help with Azure integration.